
Educational
Floor wastes, substrate and waterproofing: why movement at the drain breaks the membrane
17 October 2026
A floor waste is a small hole in a large floor, and it is where bathroom waterproofing most often fails. The reason is not the membrane product. It is that the drain is the one place where a rigid pipe, a mortar bed, a flexible membrane and brittle tiles all have to work together, and each of them moves at a different rate.
When the floor waste shifts, or the bed around it shrinks and crumbles, the membrane is stretched across the gap between them. A membrane that was applied perfectly can tear or peel at the very point it was meant to seal. Water then runs past the flange into the floor below, and nothing on the surface shows it until the damage is well advanced.
This article explains why the area around a floor waste is so unforgiving, how the substrate and the bed mix affect it, what the NCC requires, and what we do to stop it happening. It builds on our general article on wet area waterproofing, and focuses on one question: what is under and around the membrane, and does it stay put?
What a floor waste actually connects
Think of the layers at a floor waste, from the bottom up:
- The structural floor. A concrete slab, or a sheet floor on joists.
- The waste body and pipe. Fixed to the plumbing, so it is relatively rigid.
- The bed or screed. A mortar layer that creates the falls to the waste and supports the tiles. It is poured or packed around the waste body.
- The membrane. It runs across the screed and must finish at or in the drainage flange of the waste.
- Adhesive and tiles. Rigid, brittle, and glued to the membrane.
Under NCC 2022, Housing Provisions clause 10.2.29, a drainage flange must be installed with the membrane terminated at or in the flange. The same clause says floor wastes must be of sufficient height to suit the thickness of the tile and tile bed at the outlet position. In other words, the waste has to be set at the right height before the bed goes in, and the membrane has to be mechanically and chemically tied to the flange, not just brushed up against it.
That arrangement is sound as long as nothing moves. The trouble is that three of the five layers are likely to move.
Why things move around a floor waste
- The screed shrinks. Sand and cement mortar shrinks as it cures and dries. A bed that is too wet, too rich in cement, cured too fast or cured too little will shrink and crack away from the rigid waste body, opening a gap at the edge of the flange.
- The bed crumbles or sands out. A bed that is too lean, made with the wrong sand, mixed with too much water or packed in thin, feathered layers has little strength. It breaks down under foot traffic, cleaning and repeated wetting, and the support under the membrane disappears.
- The bed debonds from the slab. A bonded screed relies on a clean, prepared surface. If the base was dusty, smooth or contaminated, the screed can lift and sound hollow, and it moves independently of the slab below.
- The waste itself moves. Wastes that were not fixed firmly before the bed went in can be pushed down or knocked sideways. Pipes also expand and contract with hot water. Wastes that were raised by hand after the fact, using a thick layer of adhesive or an extension, are also prone to shifting.
- The substrate flexes. Sheet floors and timber-framed floors deflect and respond to moisture. NCC clause 10.2.9 accepts concrete to AS 3600 treated to resist moisture movement, and compressed fibre-cement sheet to AS/NZS 2908.2 supported on a structural floor, because the substrate has to be stable under the membrane.
- Trades work on it. Plumbers, tilers and others kneel, drop tools and cut in around the waste before the membrane is protected.
The membrane is bonded to the bed on one side and to the flange on the other. If those two move relative to each other, the membrane has to stretch across the gap. Most membranes can absorb small movement, and the NCC accounts for this: clause 10.2.27 requires bond breakers at junctions and at movement joints where the membrane is bonded to the substrate, so the membrane can flex instead of stretching. At a floor waste, a gap that opens after the membrane has cured is a gap the membrane was never designed to span.
The bed mix: what "right" means
The question owners often ask is what the right substrate mix is. The honest answer is that there is no single mix. The requirement is a sound, stable, properly cured bed that the membrane manufacturer accepts as a substrate. A few principles apply.
- The base comes first. The NCC lists acceptable floor substrates, and the screed sits on top of one of them. A screed cannot make up for a weak or moving base.
- Strength and shrinkage pull in opposite directions. A mix that is too lean is weak and dusty. A mix that is too rich shrinks and cracks. Trade guidance commonly cites roughly one part cement to four parts sharp sand for a floor bed, but that is a starting point, not a rule. The right mix depends on the thickness, whether the screed is bonded or unbonded, any bonding agent or additive, and what the membrane maker's data sheet says the substrate must be.
- The sand matters. Sharp, clean, well-graded sand gives a denser, stronger bed than soft building sand. Dirty or salty sand causes problems later.
- Water is the enemy of strength. A wetter mix is easier to place and weaker once set. The mix should be a damp, workable mortar, compacted firmly.
- Thickness matters. Very thin layers and feathered edges at the waste crumble. Falls should be built into a bed of adequate, consistent thickness, not created by thinning the screed to nothing at the flange.
- Cure before you coat. A screed needs time to cure and dry, and thicker beds take longer. Membrane makers specify a minimum age and a maximum moisture level for the substrate, and these differ between products. Coating a green screed can trap moisture under the membrane, which later pushes it off the bed. Our hold-point checklist records a moisture reading before the membrane goes on.
- Proprietary products can help, if approved. Some screed and repair products are designed for fast cure, low shrinkage or bonding to existing concrete. They are appropriate where the membrane manufacturer accepts them, and not otherwise.
We do not give a universal cement-to-sand ratio here because the mix has to be matched to the system. What we do is name the screed, its thickness and its cure time, and confirm the membrane maker accepts it, before the bed is placed.
Falls: where the bed does its main job
NCC clause 10.2.12 requires a minimum continuous fall of 1:80 and a maximum of 1:50 for a floor plane to the waste, and where a waste is installed the floor must be graded to it. Those falls are almost always built into the screed. That is another reason the bed matters: the screed is not just a support, it is the shape that carries water to the drain. A bed that settles or crumbles near the waste changes the falls, and water starts to pond around the flange, putting the weakest part of the membrane under constant load.
The flange detail that protects the membrane
Manufacturers of leak control (puddle) flanges publish consistent installation guidance. For example, Allproof's guidance on leak control flanges says:
- the flange should be installed flush with the finished floor surface, because a flange set proud creates a dam that traps moisture;
- the screed should finish before the flange zone, so the membrane can run from the screed onto the flange and bond fully, with a minimum continuous membrane termination surface of about 50 mm;
- the grate or channel should have weep holes at the spigot-to-flange connection, so water that gets below the tiles can drain through the waste instead of building up; and
- a bond-breaker bandage may be required where the membrane meets dissimilar materials, to allow movement.
Two practical points follow. First, screed packed up against and over the flange is a common defect, because it stops the membrane bonding to the flange and leaves the seal depending on a layer of mortar. Second, if the waste is too low, building it up with thick tile adhesive is not a repair. The right fix is to adjust the waste height or the bed before the membrane, with the plumber, because the flange and waste connection is plumbing work for a licensed plumber.
What a failing floor waste looks like
The signs usually start small, and they are easy to dismiss:
- cracked, crumbling or missing grout and bed material in a ring around the waste;
- a visible gap between the waste body and the surrounding bed;
- white mineral deposits (efflorescence) or darkening and mould in the ring around the drain;
- tiles around the waste that sound hollow or have lifted;
- slow draining, or water that sits around the waste rather than running to it;
- a damp smell, staining on the ceiling below, or damp skirting or carpet next door.
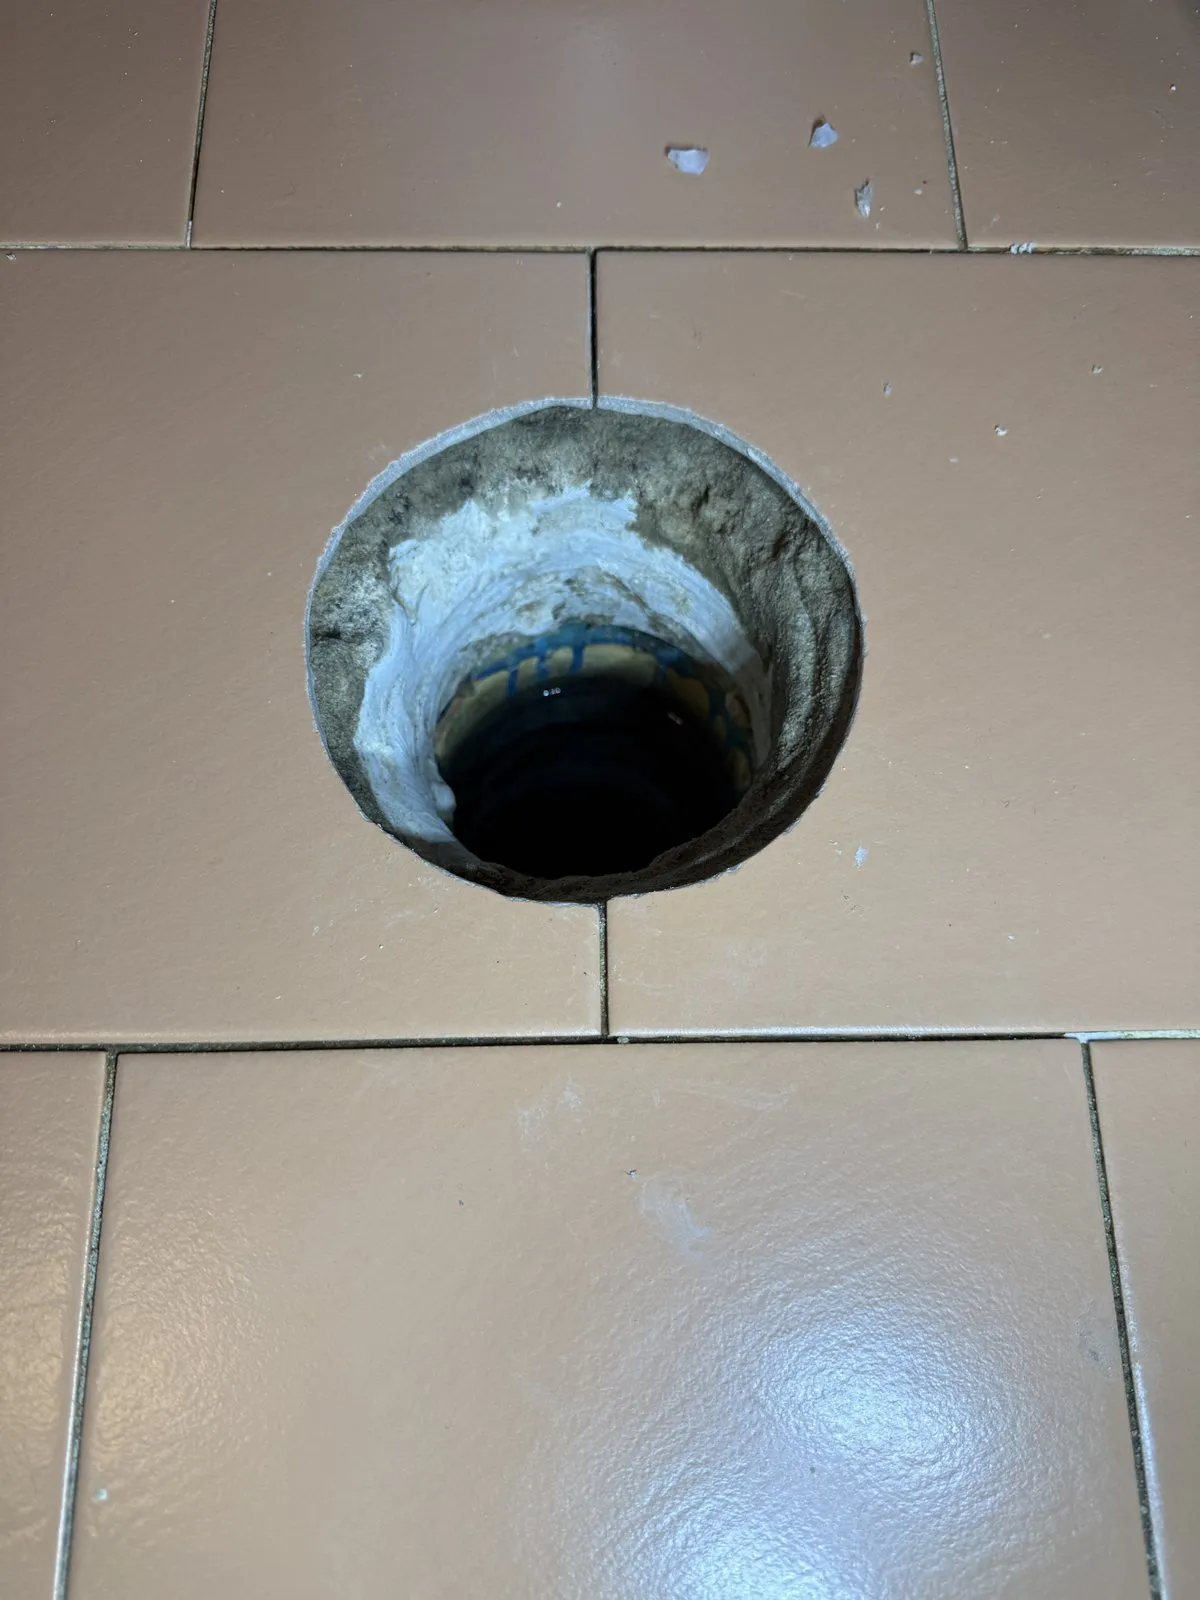
A floor waste with the tiles removed around it. The bed around the waste has broken down, and there are white mineral deposits and dark staining in the ring around the outlet. The support the membrane relied on has gone.
Any of these means water is probably getting past the membrane at the drain. Re-grouting or silicone around the waste hides the symptom and leaves the cause in place. See what a damp patch or mould is telling you for how that progression usually plays out.
What a proper repair involves
A failed floor waste junction is rarely a surface repair:
- Open it up. Remove the tiles and the weak bed around the waste back to sound material, and check the slab or floor below for moisture damage.
- Check the waste. Confirm that the waste and flange are fixed, correctly set and the right height. A licensed plumber does any plumbing work.
- Rebuild the bed. Use a mix suited to the thickness and the membrane, compacted, with the falls restored and the screed stopping short of the flange.
- Cure and test the substrate. Allow the bed to cure and check its moisture before coating.
- Re-waterproof. Apply the membrane system to the manufacturer's instructions, terminated at or in the flange, with bond breakers where required.
- Inspect and test before tiling. Photograph and record the membrane, and test it where appropriate.
If the leak has been running for some time, expect to deal with wet framing, insulation or ceilings below as well. See what happens when a renovation hides a defect and statutory warranties and defects after handover if the work is recent and you are unsure who is responsible.
Questions worth asking before the bed is poured
- Who sets the floor waste, and is it fixed firmly and at the right height for the tile and bed thickness before the screed goes in?
- What is the base, and what is the screed: mix, thickness, bonded or unbonded?
- Does the membrane manufacturer accept this screed, and what minimum cure time and moisture limit does their data sheet give?
- How are the falls being built, and are they checked before the membrane goes on?
- Does the screed stop short of the flange, and is the flange flush with the finished floor?
- Where are the bond breakers, and which junctions do they cover?
- Who inspects the substrate and the membrane at the waste before the tiler starts, and where is it recorded?
How we approach it
We treat the floor waste as its own hold point, not part of the general floor. The waste is set and fixed by the plumber before the bed. The screed mix, thickness and cure time are specified against the membrane system. Falls are checked with a level or water before coating. The flange is checked for height and clear termination, and the substrate is photographed before the membrane covers it. After the membrane, the same junction is inspected again before any tile goes down. Those records go into the handover file, which is the point of our hold points. The same approach applies to every penetration through a membrane, including the fixings discussed in choosing fasteners and screws.
If you have a bathroom with a slow drain, a ring of staining around the waste or a ceiling stain below, or you are planning a new wet area and want the substrate checked before it is covered, get in touch.
Sources
- NCC 2022 Housing Provisions, Part 10.2 Wet area waterproofing, Australian Building Codes Board (clauses 10.2.9, 10.2.12, 10.2.27 and 10.2.29)
- NCC Navigator: Waterproofing in houses, Australian Building Codes Board
- AS 3740:2021, Waterproofing of domestic wet areas, Standards Australia
- Allproof Industries: Leak control flanges, the basis of all membrane systems, manufacturer guidance
This article is general information, not technical or legal advice for your project. Screed mixes, cure times and flange details depend on the membrane system, the substrate and the manufacturer's current instructions, and plumbing work must be done by a licensed plumber. Confirm the details with the product data sheets, your certifier and the relevant standards. Full website disclaimer
© 2026 Precision Projects Group Pty Ltd. All rights reserved. This article may not be reproduced, republished or adapted without written permission.
Codes and standards change. This article reflects the code editions and standards cited at its publication date. Check the current edition and your state's variations before relying on it. See ourfull disclaimer.